Did you know that you can log off, shut down or restart your pc with a single click? Here is the way: Right click on the desktop and select create, new shorcut. Write (or browse the path) C:\Windows\System32\Shutdown.exe (where C is the letter of the drive on which Windows are installed to) and click next. Name your shortcut as you want and click finish. Then single click the shortcut you created and select properties. In target field add to the command line -1 if you want log off function for your shortcut, -s if you want shut down or -r if you want restart function. After adding this, you can add also -t x (where x is seconds) if you want a countdown until your system shuts down or restarts. Also you can add -c "text" (where text write anything you want) if you want a text message to appear when you click your shorcut.

Friday, December 22, 2006
Saturday, December 16, 2006
10 tips for a successfull blog!
 Here are ten tips that in my opinion are the element for a successfull blog:
- Write quality content. Quality content means to write on topics that other would like to read and content that you know well because to attract readers you have to write something that is not mentioned by everyone.
- Categorize your blog when you create it. Blogs that covers a lot of irrelevant subjects at the same time are not successfull most of the times.
- Write for readers and not for Google and other search engines. First of all you have to think about what would attract more readers to your blog and then how to make search engines index it.
- Start promoting your blog to blog catalogs after you have written some posts, so readers can read many posts. A blog with a single post does not attract anybody. This will help you also with the search engines.
- Put a foto on your profile to blog catalogs like technorati. People remember photos and are attracted by them.
- Read other blogs and try to come to contact with other bloggers by posting comments on their blog or by sending them an email. This will help you build relationship with other bloggers and make them come to your blog.
- Try to gain inbound links. The best way to achieve it is by writing quality contect, so others would like to link to your posts or to your blog. Links from pages with better pagerank than yours is a plus for your blog's indexing by google.
- Have quality outbound links. Outbound links will help you a little with search engines and when you link to a blog or post you liked, you will probably get an inbound link by the blogger to whose post or blog you linked.
- Have an easy-to-read blog, which means add labels and tags if you are able to, write with fonts that can be read easily and avoid black backgrounds. It is better if you include some pictures relevant to your posts, because posts with text only are not so attractive. Be carefull if you use photos from the web to your blog, as some of them are copyrighted.
- Do not advertise your blog (spam) to other blogs by leaving comments that include your url. Anyone that would like to read your posts can find your blog's url in your profile.
Bonus tips: Be patient as indexing by search engines and increasing the traffic of your blog can take time. Update your blog regularly so you can keep your readers, as a blog that is not updated for a long time seems as abandoned to others. If you will not post for a while (for example when you are on vacation) write a post to inform your readers about it.
Wednesday, December 06, 2006
Web 2.0 Logo made with Photoshop!
 I designed a web 2.0 logo using Adobe Photoshop! Thanks a lot to Alleba for his great video guide! Visit this link and create your own web logo. It is much more easier than you can imagine! Below you can see Alleba's video guide.
Saturday, December 02, 2006
How to speed up your computer's boot
As you may have noticed, when Windows boot, a lot of programs start running in the background (you can see these programs alongside with windows's processes in the task manager -processes tab- by pressing ctr+alt+del. Most of them put also an icon in system tray). These programs of course take time to load, which means that Windows take more time to boot! Most of the times, programs that run in the background are not needed, so you can eliminate your system's boot time by disabling them. Lets start:
- Press start and then select run
- Type msconfig and press enter
- In the window that appears choose the Startup tab
- Here is the list of programs that load when you boot your system and continue running in the background. Disable any program that you want, click "apply" and then "ok". Restart your system when you are promt to and enjoy how faster your pc boots!
Notice that it is safe to disable all these applications! They have nothing to do with the services that run also in background. You can leave in the startup list any program you want to load when you boot up your system (for example msn messenger or skype).
Sunday, November 26, 2006
Modify the RSS icon for your blog or site!
 The RSS feed icon has an orange colour by default. According to the RSS icon's license you are free to change its colour so the icon fits well to your site. There are two ways to change the colour: one using Adobe Illustrator (which means change the colour manually) and one using Adobe Photoshop. Illustrator gives a little bit better results but this way is more difficult if you are not an Illustrator user. Anyway most of the times we use small versions of RSS icon, so its hard to notice a difference. I will show you the "easy" way using Photoshop. Lets start! First of all download the feed icons from here (there are PSD, EPS, JPEG and PNG versions of the icon in the zip file). Unzip the file and:
- Open the greyscale folder and choose the .psd icon you want (for example the 128x128 which is the biggest dimensions offered).

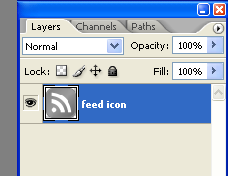
- After you open the file with Photoshop, check if the layer pallete is visible. If not press F7 to make it visible.

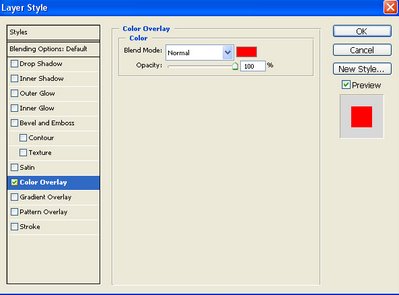
- Right click on the "Feed icon" layer in layers pallete and select "Blending Options"
- Select "Color Overlay" on the left. This will make the entire icon solid red!
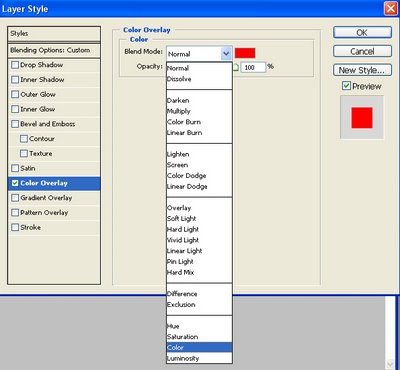
- Change the "Blend mode" to color as shown in the photo.
- Click on the color swatch and a select the color you want.
- Click ok and then go to File, save for web and then save the file in png 24 format and you are ready! I made the icon green and that is how it looks like!


Thursday, November 23, 2006
How to add a favicon to your site!
Favicon is a small icon displayed beside the url of a site and beside the site name on the tab (if you use a browser that supports tab browsing). You can see a favicon in the foto below.
 Lets see how you can add your own favicon to your web site or to your blog. A favicon is a 16x16 or 32x32 image saved in .ico or .gif or .png format. You can transform your image to these dimension using a photo editing program like Adobe Photoshop. If you do not want to do it by yourself or don't have a photo editing program you can generate your favicon here.
- Upload the photo you want, click generate and
- Download the Zip File that contains the favicons.
Now upload the favicon to your server (where you host your site). If you use Blogger, you cannot upload files. There are two ways to use favicon with Blogger. You can upload the favicon to another server that you have access to and link through blogger template there or if you have not access to a server you can create a new post called "Favicon", upload the favicon image (you are allowed to upload images in posts in Blogger), publish the post, click on the image and copy the url. When you have finally upload one way or another the favicon you have to modify the HTML template of your site or blog:
- Find the </head> tag in your template.
- Exactly before the </head> tag, paste the following code:
type="image/x-icon"/>
<link rel="shortcut icon" href="[URL]"
type="image/x-icon"/>
Where [URL] you should enter the url of the favicon (the one that you copied before).
- Save your html file, or template if you are a Blogger user, publish and enjoy your favicon.
If you generated your favicon from the site I gave above and you would like to use the animated favicon, you should upload the animated favicon to your server (or upload it via a post for blogger users) and you should enter the following code to your template in order to see the favicon's animation:
<link rel="shortcut icon" href="[URL]"/>
<link rel="icon" href="[URL]" type="image/gif"/>
If you use the code for the static favicon to the animated one there is no problem, but you want be able to see the animation in some browsers. You can validate your favicon here.
<link rel="shortcut icon" href="[URL]"/>
<link rel="icon" href="[URL]" type="image/gif"/>
If you use the code for the static favicon to the animated one there is no problem, but you want be able to see the animation in some browsers. You can validate your favicon here.
Sunday, November 19, 2006
Google Webmaster's tool to your blog!
Google analytics lets you track your visitors and be informed about how they see your blog. Time to be informed on how Google and its crawler (Googlebot) see your blog. Go the Google Webmasters page, sign in using your Google account and click "Webmasters tools (including sitemaps)". Type your blog or site url (the procedure is tha same) and click "add". Then you will be asked to verify your url by adding a META tag or by uploading an HTML file. If you use blogger select verify via META tag. Select the META tag, right click, copy. Then sign in to blogger, open the edit template window and find the < /head > tag. Paste the META tag exactly before the < /head > tag. Click save template changes. After you placed the META tag go to Google Webmasters again and click "Verify". You will be promted that your blog was verified successfully and now you can get full information on how your blog is crawled by Google. Information appears after 5-6 days (some information like page rank or crawl/index stats appear later). You can see when Googlebot last accessed your url, if your site is included in Google index, and if it is included, what page rank it has and various other query, index and crawl stats. If you had modified robots.txt and you do not allow Google crawlers to access a specific url in your site, you can see it in Google Webmasters too. Information on how to modify your template for not allowing access to search engine crawlers in a few days.
Thursday, November 16, 2006
Google Analytics to your Blog!
Google Analytics is a powerfull online free tool by Google, which helps you track your web site's visitors. It provides many information, like the reffering source for where the visitors came to your site, or where do they live, what browser or operating system do they use, how many of them visited back your web site and more. Now to the point:
- Visit Analytics site and sign up using your Google account (if you do not have one, you will be promted to create one).
- After that, sign in and click the "add website profile" button.
- Enter the URL of your blog and click next.
- Google gives you a tracking javascript code to place to your blog.
- Sign in to blogger and open the edit template window.
- Go to the end of the template code and find the < /body > tag.
- Place the code exactly before the < /body > tag (this is recommended for the tracking to work properly).
- After you place the code, click save settings and republish your blog for the changes to take effect.
- Now go to Google analytics again and click done. After clicking done the main page of your analytics account loads, where you can see that the tracking is installed, and that analytics is waiting for data from your site. Usually it takes up to 24 hours for the first data to appear in anlytics. After that data are updated every 8-10 hours. That means that you can not see with Google Analytics how many users are online in your site at a specific moment.
That's all. When you want to see information about your site visitors, sign in to Google Analytics, and click on your site's URL.
Monday, November 13, 2006
How to add a Youtube video in your blog!
First of all find the video that you want to embed in your blog in YouTube. On the right of the video there is a column below tags and above related videos list which is named "Embed"! Select the code that is written in the column, right click and then copy. Go to your blog, write the post in which you want to include the video. Then click the "edit HTML" tab (for blogger users, it is next to compose on the up right side of "create/edit post" window) and paste the code you copied from Embed column in Youtube. Be sure you paste the whole code (check that the code you pasted starts with tag). Click publish, view your blog and you are ready to watch the video you embeded!
Sunday, November 12, 2006
Migrating!
My blogs migrated to New Blogger (it should not be called beta anymore I think...). The migration was very easy (I owned a google account) except the fact that I had to customize my sidebar again because all of the HTML code I have added to my template (buttons, links, hit counter etc) was gone... Although the customisation of the template in New Blogger is very easy, you click the "Add HTML/Javascript" button, you enter the code in the popup window and that's it. You do not have to manually align buttons, counters and links or looking through the entire template to decide where to enter the HTML code so it appears exactly where you want the item to appear. The WYSIWYG (What you see is what you get) editing environment is much more usefull. If you decide to switch to new blogger, do not forget to enter again yout META tags in head section.
Saturday, November 11, 2006
How to seperate a big track to multiple tracks with nero!
All of us have mp3s and other audio tracks that are huge (for example you download a live set of your favorite dj and it is a 80 minutes non stop track). It is not usefull to burn this track in cds as they are, because the cd will contain only one 80-minute track. The solution to seperate a track like this to multiple tracks (to cut for example the live set to the tracks the dj played) is realy simple and easy for anyone! The only program you need is nero express. Lets start:
- Open nero express and import the track you want to trim and seperate. (It does not matter if the track is in mp3 or wav format.)
- Right-click on the track name and select properties.
- In properties window click the second tab which is called indexes, limit splits.
- Now you can see the track in wave form. Click the wave form, where you want to cut the track and click split. Devide the track in as many new tracks as you want.
- When you are ready, click apply and now you can burn your cd and listen to it choosing any track you want and not having to press fw or rw until you get to the song you want.
Friday, November 10, 2006
Benchmark your pc! Is it stable?
Here is a very simple guide to benchmark your computer and see how it performs. First of all download Cinebench 9.5 and Stability Test (broadand connection required for cinebench. Both of them do not need installation). Close all programs, so the maximum amount of ram and virtual memory is free. Now:
- Open Cinebench. First we are going to benchmark the cpu.
- Click the "Rendering (1 Cpu)" icon (if you have a dual core cpu this test uses only the one core).
- After the test is finished and if you have a dual-core cpu click the "Rendering (x Cpu)" icon. As you see now in the rendered picture, the process takes less time and both cores are used. When the test is fineshed you can see under "Rendering" buttons how faster is your pc when both cores are used. Performances over 435CB-CPU are considered as high.
- If you have a graphics accelerated card you can run the three graphics tests below.
- Time for stability test! That means time to burn our cpus. Unrar Stability test and double click the CPUStabTest icon.
- Select Normal mode and click start. Stability test uses 100% of cpu. To see if your system is stable let the test burning your cpu for about 12 hours. If after 12 hours your system has not restarted and has not crashed, it means that it is stable and that it has no thermal problems.
If your system crashes or restarts, you should pay attention to its thermal behaviour. Check that the air flow in the pc case is ok, and clean the fans (dust does not let them work correctly).
Clean up!
If you notice that your hard disk drive is almost full, try the followings:
- Go to start-->Programs-->Accessories-->System tools and run a disk cleanup. Decide what you want to delete from the list and clean it.
- After you cleaned your drive, double click on my computer icon. After my computer is opened, click Tools on the top, next to Favorites, and select Folders Options. Select the Second tab next to General
- Select show hidden files and folders.
- Click ok.
- Now you should be with my computer folder opened if you followed the steps above. Double click your hard drive icon (C: probably)
- Double click documents and setting
- There should be three folders: One with your name, one called "Default user" (which is hidden folder) and one called "All users". Double click to open the one with your name.
- Double click Local Setting (also hidden folder) and open temp folder.
- Delete everything that is in this folder.
- Empty your recycle bin and you are ready.
Temp folder contains files that are usually used, or installation temporary files. These files could be safely deleted without causing problem to the windows xp installation and stability. Temp folder could contain Gigabytes of data if it is not oftenly cleaned.
Speed up your pc!
If you feel that your pc is slow, you should try the followings: Windows XP use a page file, which is realy big (sometimes it is up to 4GB). The page file is virtual memory. The pc uses virtual memory like RAM, but virtual memory is space on your hard disk, which is much slower than your RAM memory. If you have 512MB-1GB RAM do the followings:
- Right click on My Computer icon, select properties.
- Select "for Advanced users" and click the first "options/selections" button
- Select "advanced" and on the Virtual Memory tab click change
- Select the first button so you can set the capacity of page file and type in both spaces 1024. That means that your page file will be 1024 MB all the time.
- Click ok and restart your system when you are promted to so.
- When the system restarts, defrag your hard disk drive using windows defragment tool and you are ready!
If you have 2GB RAM or more you do not need to use page file. To set page file off, follow steps 1-3 and select "Do not use page file". Click ok and restart your system.
Subscribe to:
Posts (Atom)


![[Valid Atom 1.0]](http://nikospsy2k.googlepages.com/valid-atom.png "Validate my Atom 1.0 feed")